STAGE TWO
For those of you who took the plunge and successfully completed the first step to this mod, congratulations! You now have one of the most versatile and personalized Smartwatches available. If you wish to continue a step further into re-implementing the communication capabilities of your watch after modding your strap then follow on.
This tutorial is in fact a fairly simple mod, however if you are not technically inclined and have solid manual dexterity, then I suggest you find someone that can do this modification for you, therefore
“PLEASE USE THIS GUIDE AT YOUR OWN RISK, AS I WILL NOT BE HELD RESPONSIBLE FOR ANY “#%&-*p$!”
This tutorial is a continuation of the original tutorial.
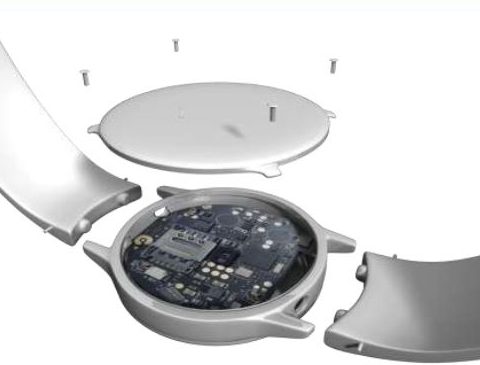
Step 1. Remove the back of your watch as before.
Step 2. Remove your custom strap
Step 3. Place watch screen down on a soft and slip proof surface like a mouse pad
Step 4. Take your original strap that you removed from your watch and using an exacto Knife, carefully slice between the leather straps backing and front; as if to cut the stitching and create a slit. Be careful not to push the knife too deep into the strap as you may cut the embedded antenna, but just far enough to cut the stictch.
Step 5. After creating a slit that you can get your fingers into, slowly pry apart the straps, thus separating the front from the backing. Work from the end of the strap upwards towards the antenna wire. The closer you get to the antenna the more difficult it will become and the more careful you need to be as you stand the risk of damaging the antenna either by yanking the wire’s soldering or cracking the somewhat flexible antenna.
TRY NOT TO BEND ANTENNA TOO MUCH AT ANY TIME!


The antenna taken from the buckle is your Bluetooth and GPS antenna and has two cables
The strap with the holes hold your GSM antenna
I personally do not use GPS so I cut that lead. If you wish to do the same simple hold the antenna near your watch to see where the two leads clip down, then you can cut the lead if you don’t want it.
I also removed this lead to accommodate embedding the Bluetooth and WIFI within the watch housing.
Step 6. Cut a strip of leather about 20mm in width and 30mm in length and fold it in half.
Try to use a piece of leather that is as thin as possible. If it is not very thin use a knife to shear the end that the wires will extend from (so it will fit between the watch body and backing.
Step 7. Cut a piece of firm plastic (maybe from an expired gift card) to the exact area of your rectangular shaped antenna, and stick it onto your antenna either with some sought of fast drying glue or double sided tape.
This is done to keep the antenna flat at all times and will result in a higher decibel signal (around -65 in your settings) and also reduce interference during calls.
Step 8. Take this new antenna assembly and place it within your folded leather booklet, and tuck it into the crease of the fold; with the wire extending outwards. Using a glue gun thinly coat the interior of leather to finalize the complete assembly.
See fig. for final assembly.

Step 9. Place the antenna assembly in place at the edge of the watch body as shown then carefully clip antenna coax onto pc board (GSM)
Step 10. Using a file or a Dremel, cut away enough of the back covers edge to allow for the firm clamping of the leather antenna between the body and the backing. You may need to remove more material from the watch backing with your file if the fit is too tight. Although the leather will compress (maintain waterproof classification) if it is still too thick, it may bend the screw holes of your backing or strip the thread of your screws.

MAKE SURE TO WASH AND BRUSH AWAY EXCESS METAL FROM BACKING ESPECIALLY AROUND THE MAGNETS!
Once you have finalized your fit and the backing has been attached you are good to go as far as GSM goes!
Step 11. Back to your Bluetooth antenna. I found that because I didn’t care for the GPS I was able to trace the GPS lead and cut away that part of the circuit on the antenna. This made the antenna thin enough to fit within the watch housing.

Because the Bluetooth and WIFI use short range communication, we can actually get away with simply putting this antenna inside the watch. As shown. I’m not that fussy about using the WIFI, but I needed the Bluetooth to work with my in-ear Bluetooth earphone for calls.

That’s it!
Enjoy.
Check out my LF16 custom strap Hack!
